New Website

Please Visit My New Site HometownSlop.com

Showing posts with label grilling. Show all posts

Wednesday, December 5, 2012

Brined and Smoked Thanksgiving Turkey


About two months prior to Thanksgiving I was assigned the task of bringing the turkeys. Okay, I might have volunteered. Sous Chefs Sam & Jesse know that when I volunteer, it means all three of us.

I took some time pondering what would be best. Smoking the turkey was definitely a must as I had done this last summer. I heard of brining but never had done this. As I studied more about it, I was getting very excited. There are so many ways to take it, the only question was which one?

Brining is a process where you marinate the meat in a salt solution allowing it to retain more moisture. Basically, salt water and many variations of spices are used. We went with a simple brine.


Simple Turkey Brine

1 turkey, up to 16 pounds
3/4 cup plus 2 tablespoons kosher salt
3/4 cup sugar
1 carrot, peeled and diced
1 large onion, diced
1/4 cup celery, diced
2 large sprigs thyme
2 bay leaves
1 tablespoon black peppercorns
1/4 teaspoon crushed red pepper flakes
1/4 teaspoon fennel seeds

Bring salt, sugar and 4 cups water to a boil in a very large pot, stirring until salt and sugar are dissolved. Turn off heat, add remaining ingredients to brine base. Refrigerate uncovered, until cold. Adds 6 quarts water cold water to pot or bucket. Add turkey. Use plate, if needed, to fully submerge turkey. Cover, chill up to 72 hours (The turkey will be more moist and flavorful if allowed to brine the full 72 hours).

Smoking the turkey. Having smoked a turkey this past summer, I had a few key points regarding the process. We mixed rosemary with unsalted butter and rubbed the turkey inside, outside and under the skin. To stuff the turkey, we added sliced apples, oranges and red onion to the cavity, tied the legs and placed in the smoker for 3 1/2 to 4 hours.

Every 30 minutes we would spray the turkeys with apple cider for a tasty glaze. Last month, I did this with a pork shoulder and it was delicious.


It was a large family gathering so there would be 31 judges of our cooking. Prior to dinner I huddled with Sous Chefs Sam & Jesse to get our story straight. If the turkey was delicious, we all participate in the glory. If it was not good, then Jesse would take the fall. He reluctantly volunteered.

The verdict was unanimous, it was wonderful. I had never experienced such moist, flavorful turkey. The hickory smoke, apple, brine and all other ingredients was a menagerie of taste.


Sous Chef Sam wasted no time gorging himself

This was quite a process. One week prior to Thanksgiving we purchased the turkeys. After 4 days, they were adequately thawed. We then placed the turkeys in the brine from 8:30pm Monday to 7:30am on Thursday. At 8:30am, they were on the smoker. It was a tiring but beautiful experience. Food is an adventure, not a routine.


Happy Eating

Wednesday, October 17, 2012

Boston Butt with a Honey Mustard Glaze


Now that's a Big Butt!

What is a Boston Butt you ask? It's another name for Pork Shoulder. It's one of the meats that we judge at KCBS Competitions and it's incredibly delicious. With another dinner coming up for the Society of Divine Foodies, I was excited to smoke a Boston Butt. It was another cut of meat on my list since I received my Traeger Smoker.

It's amazing the amount of time it takes to smoke a butt, 1 1/2 hours per pound. Thankfully I marinated it Thursday night and put it on the smoker first thing Friday morning. Any day which starts with meat on the grill is a good day. Having never smoked one before, I was a little anxious.


The Smoker, 8:30am. That's the start of a good day!

Honey Mustard glazed Boston Butt

1 5-7 pound Boston Butt/Pork Shoulder
3/4 cup yellow mustard
1/3 cup honey
2 tablespoons Cajun seasoning
1 tablespoon brown sugar
Salt & Pepper, to sprinkle
2 cups apple cider

Sprinkle salt & pepper over meat. Mix yellow mustard, honey, Cajun seasoning and brown sugar in bowl. Spread honey mustard mix over every area of meat. Preheat smoker to 225 degrees. Place water pan in smoker to keep meat moist. Spray apple cider over meat every hour. Cook meat for 1 1/2 hours at 225 degrees for every pound of meat. It fully cooked when internal temperature reaches 160 degrees.


The Smoker, 3:30pm

It's a sight of pure beauty. I had to be careful not to stand there staring for too long every hour when I sprayed with apple cider. The temperature drops fast and takes a while to recover. Needless to say, it was beautiful when we pulled it off the grill 9 hours later.


6:00pm: off the smoker and resting

I had Sous Chef Sam pull, slice and chop the pork. We couldn't help but taste test every few minutes. The crispy glazed exterior was something which belongs in a meat museum. It was the highlight of my day. Most of the honey mustard cooks off but allows the rub to stay on. There were hints of Cajun seasoning but nothing overpowering. You could taste the apple cider and it was delicious.


Sous Chef Sam performing The Chop

To serve, we placed the pulled pork on rolls, scooped on cole slaw and lathered apricot barbeque sauce over the top. Wow! Due to many people at our home, Sous Chef Sam and I ate at Ruby's little table. Our knees were higher in the air than our plates of food. Uncomfortable but once you bit into the pulled pork slider, all your troubles were forgotten.

In addition to the pulled pork, we had skirt steak with scallion sauce, grilled patty pan squash and caramel chocolate cake among other items. Most of us were too full to move, yet we kept on nibbling. It was a night to remember. And just in case I fell in love with Boston Butt, I bought two. There is one in my freezer just waiting to be smoked. Most people count sheep when they can't sleep. I think about what glaze I can do on my next piece of smoked meat.


Happy Eating

Wednesday, October 3, 2012

Anaheim Chili Smoked Chicken


As I fall more desperately in love with my Traeger Smoker, inspiration flows freely. Saturday morning I was at the grocery store and picked up two whole chickens (not live chickens). The day got busy and around 3:00pm I realized that I had to figure out a marinade. Having done a Herbed Butter Smoked Chicken before, I knew that deliciousness was definitely possible.

Butter would have to be the first ingredient to give it that crispy skin. As I looked around, I knew that I wanted it to have some fire, some herbs, be moist, tender, and frankly the best chicken that has ever been eaten. Okay, humility now but the wow factor was definitely in play. I chopped a shallot, added Dijon mustard, minced an Anaheim chili peppers, cut up some basil, added some ground pepper, a few drops of apple cider vinegar, and seasoned the bird with salt.


A Smoking Chicken

Anaheim Chili Smoked Chicken

1 4-5 pound chicken
1/4 pound butter
1 shallot, minced
1 tablespoon Dijon mustard
1 Anaheim chili pepper, chopped
1 cup basil, chopped
1 teaspoon fresh ground black pepper
1 teaspoon apple cider vinegar
Seasoning salt to sprinkle over bird

Dry chicken with paper towels. Mix butter (soft but not melted), shallot, Dijon mustard, Anaheim chili pepper, basil, black pepper and apple cider vinegar in a bowl. Rub butter mixture thoroughly over bird including under skin and in cavity. Tie legs together. Preheat smoker to 375 degrees. Place bird directly on grill rack with breast up. Smoke for 1 hour 15 minutes. Check internal temperature of bird and remove from smoker when internal temp is 165 degrees.

As you bite in, you will taste the heat of the peppers and the sweet tanginess of the shallot. The butter will leave the skin crisp and flavorful. The basil adds a freshness to the bird. It's a beautiful creation. Now what do 3 people do with a whole roast chicken in the fridge? Maybe breakfast, lunch and dinner.


Happy Eating

Wednesday, September 5, 2012

Smoked Roasted Chicken with Herbed Butter


My love for the smoker grows each time I use it. Traeger recommended this recipe for whole roasted chickens. I quickly fell in love when I found a whole chicken at the grocery store runs $5-$7, cooks in under 90 minutes, and feeds many.

Sous Chef Sam and I made 2 chickens along with Roasted Tomato Bisque and Herbed Garlic Mashed Potatoes.

Smoked Roasted Chicken with Herbed Butter

8 tablespoons butter, at room temperature
1 scallion, white and green parts finely minced
1 clove garlic, finely minced
2 tablespoons minced fresh herbs, such as thyme, rosemary, oregano, basil, sage or parsley, plus extra sprigs for roasting
2 1/2 teaspoons Cajun Seasoning
A few drops of fresh lemon juice
1 4-to-4 1/2 pound chicken

In a small bowl, combine the butter, scallion, garlic, minced fresh herbs, 1-1/2 teaspoon of the rub, and the lemon juice and blend well with a wooden spoon.


Herbed Butter


Remove any giblets from the cavity of the chicken. Wash the chicken inside and out with cold running water. Dry thoroughly with paper towels. Sprinkle the remaining 1 teaspoon of the rub in the cavity of the chicken. Slip a few sprigs of fresh herbs (see list of options above) into the cavity as well. Smear the outside of the chicken with the butter-herb mixture. Tuck the chicken wings behind the back. Tie the legs together with butcher’s string.

Ready for the Grill. Notice Sam's fabulous knots?


When ready to cook, start the Traeger grill on Smoke with the lid open until the fire is established (4 to 5 minutes). Set the temperature to 400 degrees F and preheat, lid closed, for 10 to 15 minutes.

Oil the grill grate with vegetable oil. Place the chicken on the grill grate, breast-side up, and close the lid. After 1 hour, lift the lid. If the chicken is browning too quickly, cover the breast
and legs with aluminum foil. Close the lid and continue to roast the chicken until an instant-read meat thermometer inserted into the thickest part of a thigh registers a temperature of 165 degrees F, 15 to 20 minutes more. Remove the chicken to a platter and allow to rest for 3 minutes. Untie the legs and carve.

We used Rosemary, Basil, and Cilantro in the butter and Rosemary in the cavity of the chicken. Knowing that Sous Chef Sam has a knack for knot tying, I asked him to tie the wings and legs. He would have made the Mafia proud with his knots. I also love that Sam has a similar gift as myself-saying what's on his mind before thinking about it. After tying the knots he said, "Wow, messing with chickens is kind of morbid. Do you think that most serial killers got their start as butchers?" Oh how I love my Sous Chefs.

As we opened the grill to check on the chickens, the crispiness of the herbed-butter crust was something that belonged in a museum. What a work of art. I stood there in awe, not wanting the ruin the perfection of the moment. "And I knew just as surely, just as clearly, that life is not a work of art, and that the moment could not last" (A River Runs Through It).

The chicken was moist, tender and perfectly crisp. Since it's only on the smoker for 90 minutes, the flavor doesn't incorporate as far, but it was delicious anyway.

The Grill can fit 6 chickens at a time. Any suggestions on recipes?


Happy Eating.

Friday, August 10, 2012

Thai Chicken Skewers: More Grilling Bliss!


While searching for more delicious recipes for the smoker, we came across a recipe for Thai Chicken Skewers on the Traeger site. I was sold immediately on the name alone. Rachel encouraged me to research further, but research and my personality do not mix. More on that another day.

Thai Chicken Skewers

2 pounds boneless skinless chicken breasts
1 cup fresh cilantro leaves
1/2 cup unsweetened coconut milk
3 tablespoons fresh lime juice
2 cloves garlic, coarsely chopped
1 1-inch piece fresh ginger, coarsely chopped
2 tablespoons brown sugar
1 tablespoon Thai red curry paste
1 teaspoon ground cumin
1 teaspoon freshly ground black pepper
Your favorite Asian peanut sauce for serving


Slice the chicken lengthwise into 3/8-inch wide strips; easier if chicken is partially frozen first. Place the chicken strips in a Ziploc bag. In a food processor, combine the cilantro, coconut juice, lime juice, garlic, ginger, brown sugar, curry paste, cumin, and pepper; blend until smooth. Pour over the chicken strips and refrigerate for at least one hour. Drain the chicken and discard the marinade. Thread the chicken strips onto bamboo skewers. When ready to cook, turn grill on high. Arrange skewers directly on the grill. Slip a piece of aluminum foil under the exposed end of the skewers to prevent them from burning. Grill the chicken until cooked through, turning once, about 4-6 minutes per side.


You notice that even though this is a Traeger recipe, we did not cook this on the Traeger grill. This is due to the short cooking time which is not conducive to the smoker. Each time we would open the lid to re-arrange the skewers, all the heat would escape and it was 10 more minutes to get back up to cooking temperature. After one batch, we switched everything to the propane grill.

This dish received rave reviews. One party attendee even had more chicken skewers for dessert. The marinade was perfect but I did tone it down. I gave Rachel a taste test and it was far too strong. We added some brown sugar and more unsweetened coconut milk.


The absolute best part of the skewers: when you make 75 of them, you get a lot of leftovers for breakfast, lunch, brunch and midnight snack.


Happy Eating.

Wednesday, August 8, 2012

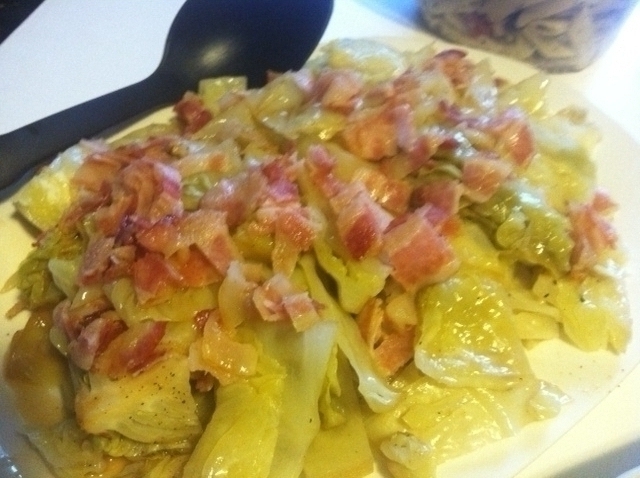
Smoked Cabbage with Bacon

Since I received the Traeger Smoker for a birthday gift, I have been searching for delicious recipes. Having little experience with smoking meat (or smoking much else for that matter), I am learning the basics and expanding from there. It is the turning out to be the best education of my life.

Rachel came across a grilled cabbage recipe on Pinterest from www.greenlitebites.com, which we decided to cook on the smoker. Having just received a fresh cabbage from our CSA, the timing could not have been better.


Smoked Cabbage with Bacon

1 green cabbage, quartered
4 teaspoons olive oil
4 tablespoons lemon juice
2 tablespoons Worcestershire sauce
1 teaspoon salt
1 teaspoon fresh ground pepper
1 package bacon, baked


Wrap each quarter of cabbage in tin foil with 1/4 of each ingredient. Smoke at 400 degrees for 30 minutes. When finished cooking, spread chopped bacon on top.

This dish is very delicious. The bitterness of the cabbage is married perfectly with the lemon & Worcestershire sauce. The bacon adds some depth and crunch. We had two full plates and they both went quickly. Sous Chef Sam even took some home to have for breakfast.


Happy Eating

Wednesday, July 25, 2012

Smoky Meatball Subs

As the Fourth of July approached, I fretted about what to cook. Since my Traeger grill was only 4 days old, I definitely needed to utilize it. The "Smoky Meatball Subs" recipe on the Traeger website lept out at me. It's something delicious, something that wouldn't take a long time (as most smoked meats do), and something that would put me in the center of attention, J/K.


Sorry, Bad picture

There is actually more preparation work involved than actual cooking time. No fear, I had Sous Chef Sam to help me.


Smoky Meatball Subs

1 1/2 pounds ground beef
1 large egg
1/3 cup milk or buttermilk
2 tablespoons Worcestershire sauce
1/2 cup dry seasoned bread crumbs or crushed croutons
1 tablespoon Cajun rub
1/4 cup onion, finely minced
2 cloves garlic, finely minced
1 1/2 teaspoons freshly ground black pepper
Marinara Sauce (the recipe said jarred marinara sauce but that's insulting). Use my recipe minus the meat.
4 6-inch hoagie rolls
Thinly sliced or grated provolone cheese

In a mixing bowl, use a whisk to beat the egg. Whisk in the milk and Worcestershire sauce. Stir in the bread crumbs and Cajun rub. Let the mixture sit for 5 minutes.

In another bowl, combine the ground beef, onion, garlic, and black pepper. Add the egg mixture to the meat mixture and combine well. (Your hands work best for this). If the mixture seems dry, add a bit more milk. If wet, add a few dry breadcrumbs. Roll the mixture into balls about the size of a golf ball.

When ready to cook, start the grill on Smoke with the lid open until the fire is established (4 to 5 minutes). Se the temperature to 325 degrees and preheat, lid closed, for 10 to 15 minutes.

Arrange the meatballs directly on the grill grate. Bake for 30-35 minutes, or until the meatballs are cooked through.

Brush the hoagie rolls with olive oil, place 3 to 4 meatballs inside, spoon marina sauce over top, place as much cheese as desired over top (the more the merrier), place back on grill until cheese is melted. Enjoy.


Sous Chef Sam placing the meatballs on the grill

Quite a sight: 82 smoked meatballs

If you do not have a Traeger grill, this can still be done. You might not get your desired smoke flavor but can still cook a fabulous meatball.


A Fourth of July favorite. The pink edge of the meatball is actually the smoke ring

I quadrupled the recipe and there was plenty of meatball subs to go around. They were delicious with flavor at every level. How grateful I am that I decided to purchase the larger grill. It fit 82 meatballs.

Happy Eating.

Wednesday, July 18, 2012

Apple Rosemary Smoked Turkey

As you have probably heard by now, for my birthday I received a Traeger Smoker from my wonderful wife. It's one of those gifts that you truly cherish, unlike gifts received that we wish we could take back and keep the cash. In the first week of having the grill, I used it three times: ribs, smoked meatballs and smoked turkey.


Rachel's birthday was last Friday. The day to smoke the turkey had arrived. Admittedly I was a little nervous as this was my first time cooking a turkey. What if it did not turn out? You can't serve poultry medium rare-despite what I told my nephews.

The best way to alleviate fear is to take a step forward. I cleaned the bird, semi followed a Traeger recipe, and made it up from there.


Apple Rosemary Smoked Turkey

1 fresh or frozen thawed turkey (15 lbs)
3-4 tablespoons poultry rub
2 tablespoons olive oil
3 Gala apples, thinly sliced
4 sprigs fresh rosemary

Wipe turkey surface and cavity with wet paper towels. Lightly rub oil over the surface and cavity of the turkey. Sprinkle a light coating of poultry rub on the surface and in the cavity of the turkey. Place sliced apples and rosemary sprigs in cavity of the turkey. Start grill on smoke with lid open until fire is established (about 5 minutes). Switch to "medium" or 300 degrees on the digital thermostat. Place turkey on the center of the grill, close lid and cook for 3 1/2 - 4 hours or until internal meat temperature is 160-165 degrees in the thickest part of the breast. Allow to rest for 20-30 minutes before carving.

Since it is July, the likelihood of finding the size of turkey that you want is remote. I went to the store and had my choice of 4 turkeys; 19, 20, 21, and 22 pounds respectively. It took 2 1/2 days to thaw out. No worries however; a larger turkey means more leftovers.

Rachel's party was fabulous. It was a small gathering with lots of wonderful food. We had a very spicy, very delicous chip dip, a tasty pasta salad, and a green salad that was exploding with flavor. I am also grateful to some wonderful friends who took care of dessert when I realized that I couldn't make it happen.


The turkey turned out great. It received rave reviews and we ate it for the next 2 days. I probably won't eat turkey again for a couple of weeks. It was moist and the hickory smoke flavor came through. Anytime you can get a flavor on a white meat, you are doing good. One thing I won't do again is smoke the turkey in a foil pan. It helps collect the juices but the underside does not get as crisp.


I was a little worried when I cut into the turkey and the outside looked pink. How could the inside be cooked more than the outside? It is actually the smoke ring; very interesting to see how far the smoke works it's way into the meat.

The Traeger Smoker sure is paying off.


Happy Eating

Friday, July 13, 2012

6 Pounds of Ribs

For my birthday last week, my wife took me to Costco and had me pick out a Traeger grill. Originally I was thinking of the Little Tex Elite but ended up with the Texas Grill. I liked the size and portability of Little Tex but then I found out that it uses the same amount of wood pellets and has almost half the rack space of Texas. I knew by the second time I used it, I would want the larger model. Why smoke 2 turkeys at once when you can smoke 3?


I could be a Model for Traeger; except then I might have to wash my hair and shave

Saturday morning was spent assembling the smoker. Not my favorite thing but a necessary evil in order to get you closer to smoking-smoking meat that is. Quite a sight when it was complete. It looked like it could swallow our other grill whole.

To break in the grill, I smoked some ribs. Having never cooked ribs before (except in class), I was a little lost. I made a rub with some Cajun spices and a lot of brown sugar. I was anticipating a sweet glaze on the ribs. My In-Laws had purchased a quarter cow and gave me the spare ribs.


First time cooking on the grill

To start, I smoked the ribs for 2 hours with hickory wood pellets. I then cooked for 3 more hours at 225 degrees. Yes, the grill has temperature settings. It was truly a work of art to watch the cooking process. The hickory smoke blowing in the air created the most beautiful aroma. When complete, I carved them and was amazed at the sheer amount of meat.

The final verdict: the meat was moist and tender but the flavor was missing. It seemed like none of the spice rub flavored the meat. I did learn a valuable lesson: attempting to flavor over 6 pounds of meat will take a lot more seasoning then what I am use to. A simple rub of spices on a steak or breast of chicken will suffice but not on this. I also should have placed the ribs in foil with some flavoring liquid with an hour to go.


5 hours later, the ribs are ready

So the meat did not turn out liked I had hoped but I love the grill. It's truly one of the best presents ever. Word had definitely spread overnight as the next morning, most people that I spoke with knew about the grill. Sounds like there will be many mouths to feed.


Happy Eating.

Friday, July 6, 2012

Salmon with Tangy Avacado Sauce


This past Saturday we had a BBQ at our home. It was a get together of divine Foodies and we did not disappoint. Craig made about the best chicken caesar salad ever. His homemade anchovy dressing is something that should be etched in history. Penny did bleu cheese sliders-ground beef stuffed with basil and bleu cheese. They were so good that time seemed to stand still for a moment. She also brought a insalata caprese as her side.

My first thought when finding out that these were going to be some of the dishes was, "do I dare cook anything?" How do you keep pace with that? I put on a BBQ Friday night so I was consumed with that. It was Saturday afternoon before I had fully put my dish together. A couple of days prior, I had purchased a Sockeye Salmon Filet from Costco. The big question was what to do with it from there? Do I do an herby/summer salmon with grilled corn, cherry tomatoes, balsamic and basil? Since I knew herbs would flow freely that night, I was looking for a more tangy sauce that hits your mouth and makes it water.

Thank you Pinterest; or thank you Rachel for researching Pinterest. On there she found a "Salmon Sliders with Tangy Avacado Sauce" recipe from http://www.dineanddish.net/. We decided that since Penny was bringing sliders, we would grill the whole filet of salmon and drizzle the avacado sauce on top.

Tangy Avacado Sauce


1 ripe California avacado, peeled and sliced
1/4 cup mayonnaise
1/4 cup sour cream
1 tablespoon milk
1 1/2 teaspoons distilled white vinegar
1/8 teaspoon Kosher salt
1/4 teaspoon cracked black pepper

In a medium sized bowl, mash the avacado

Stir in mayonnaise, sour cream, milk and vinegar until smooth. Add Kosher salt and cracked black pepper and stir until incorporated.

Spoon Tangy Avacado Sauce over salmon. Top with slices of fresh avacado.


Sous Chef Jesse grilled the salmon to perfection and Sous Chefs Sam & Tai made the sauce; all under my strict supervision of course. Those guys are fabulous. Right after we put out all the food, my sprinkler guy showed up. With a dying lawn, I wasn't about to send him away. I spent about 30 minutes outside with him; most of it thinking about the food. Thankfully Jesse brought me out some food because when I came back in, much of it was gone.


In business books they say to surround yourself with those who make you better. This group certainly does that. I am always grateful for the wonderful Food knowledge that they so willingly share.

Happy Eating

Wednesday, July 4, 2012

Hometown Slop: The Tour continues!


Well we sold out our event in Cottonwood Heights, and last week we put on a show in Draper. Next up: Tokyo, Singapore, Hong Kong, Manila, Berlin, and New York.


Sage Pork Tenderloin

This event was for about 35 people at my Bother & Sister-in-Law's home. The menu was left up to me and of course I wanted to impress. We went with Sage Pork Tenderloin, Bratwurst, Cheeseburger of Champions, and Juicy Lucy Burgers. No simple burgers & dogs here.


Happy Grilling

For the majority of the event, I was outside at the grill. Rachel told me that I received rave reviews and people came back for seconds & thirds. It was a lot of fun. Biggest lessoned learned: grilling is the fun part, the preparation is where you do all the work. And the preparation takes a lot longer when your two Sous Chefs are out of town. Oh how I missed them.

Thanks Kim & Todd for the opportunity.

Happy Eating

Friday, April 13, 2012

To Grill or to Smoke?

No, I am not referring to smoking cigarettes. I am referring to smoking meat on the grill. Ironically, this is something that I have never done except in cooking class. My grill uses propane and was purchased for $35 at a garage sale back in 2005-thank you Rachel. It still works beautifully. I love to grill (see blog post here). Just last night we grilled some burgers; last week chicken; and the week before that we grilled pork tenderloin. 


The $35 wonder. We have had it since 2005 and it is wonderful.

The reason for my consternation is the desire to do some smoking. Having indulged in some good BBQ lately (see post here), it's difficult to repress the desire to enjoying some fabulous meats with a perfect smoked flavor. All winter I have dreamed of this. While visting Mississippi and Tennessee last fall, I met some people who know what grilling and smoking is all about. A devout Ole Miss fan told me that the football team wasn't much this year but that the food at the tailgating parties was still wonderful.


Hard to see but this Ole Miss Fan's grill was towed by his truck. There are actually 3 grills on the trailer. It was such a beautiful sight; one of the most beautiful sights in Tupelo, Mississippi.


Here are a couple friends I made in Lawrenceburg, Tennessee. They run the Big City Deli in the town square. You can see the grill in front. It was made from a 200 gallon propane tank. On the menu that evening: chicken and pork. They even invited us back for karaoke later.

I am requesting any suggestions for smokers and your great recipes for smoking ribs, brisket, chicken, etc. I may just invite you over for a Saturday of smoking, watching baseball and eating fabulous food.


Happy Eating and Smoking

Friday, March 30, 2012

Grilling Season is upon us

Last June I was asked to be the Grillmaster for a Neighborhood BBQ. I brought my two nephews, Sous Chef Jesse and Sous Chef Sam. On the night before we spent many hours doing prep work as we prepared 3 varieties of burgers & a chicken dish. The night of the BBQ was intense; fed over 50 people. Lots of work, lots of fun. We even had 2 grease fires. The most aggravating part of the BBQ was when someone brought over a package of vegetarian burgers and asked me to cook them. How insulting!

Here is a list of grilling tips which I provided at the BBQ. Included here is the recipe for Cheeseburger of Champions; heavenly burger.

Spring just officially started which means there are at least 6 months of good grilling a head.


Happy Grilling and Eating

Friday, March 2, 2012

Key West Chicken: Quick, Easy, and Delicious


While in Florida last month, my cousin introduced me to this flavorful dish. We were relaxing after a day spent fishing and were coming up short on dinner ideas. Thankfully there were chicken breasts in the fridge, so he sent me to the kitchen with instructions on how to make Key West Chicken. Last week I was in a similar quandry: evening, tired, hungry, no dinner ideas; found thawed chicken in fridge and it was on. I made a few adjustments from what I learned in Florida but it was delicious nonetheless.

Key West Chicken:


4 Chicken Breasts
1 Jar Salsa
1 Can Black Beans, 15 oz
1 Can Diced Chiles, 5 oz
1 Bag Frozen Corn, any size-just spoon some out
Grated Cheddar Cheese, a lot
Lime Juice, just a squeeze
Salt & Pepper, just a shake
Steamed Basmati Rice

Set the chicken breast on a large sheet of aluminum foil; enough to make a tent of foil over the chicken when closed. Squeeze lime juice over top of chicken. Sprinkle with salt and pepper. Spoon a good serving of black beans, salsa, chilis and corn on chicken. Enclose chicken in foil and place on grill (high heat). Cooking time is approximately 20 minutes. When chicken is cooked through, open up foil and scoop in a large amount of cheddar cheese. Close foil, put back on grill for 1 minute, remove from grill, take chicken out of foil and place on bed of basmati rice. Enjoy.

Hint: Always add more salsa than you think you need. If you scrimp on salsa, it still flavors the chicken but leaves it without sauce.

This is a very filling dish. Rachel commented that she would like less chicken and more toppings.


Happy Eating.

Friday, February 17, 2012

Grilled Pizzas: The dish that I am loved for the most


The popularity of Grilled Pizzas at our home has led my nephew to proclaim that this would be his final meal should he ever be on death row. Having no doubt that he is headed there in a few years, I decided to make this yesterday and invite them over.

There are a lot of ingredients and instructions but keep going; it's well worth it in the end.

Grilled Rosemary-Crusted Pizzas with Spicy Italian Sausage, Bell Peppers, Onions and Cheese

Dough:

Save yourself a lot of time and purchase the Rhoades roll dough. These will pound out into the ideal size of 9-inch round. Sprinkle fresh chopped rosemary leaves into the dough.

Toppings:

3/4 cup olive oil
6 tablespoons balsamic vinegar
3 tablespoons minced garlic
2 tablespoons chopped fresh rosemary
1 pound johnsonville mild italian sausages
2 yellow or red bell peppers, cored, quartered lengthwise
1 large onion, peeled, cut into 1/2 inch-thick wedges

Whisk first 4 ingredients in medium bowl. Let vinaigrette stand 15 minutes at room temperature or refrigerate up to 2 hours.

Prepare grill on medium heat. Arrange sausages, peppers, and onion on baking sheet. Brush with some of vinaigrette. Sprinkle with salt and pepper. Grill sausages until cooked through (about 15 minutes turning occasionally). Grill peppers and onions until slightly charred and crisp-tender, turning and basting once, about 8 minutes.

Transfer sausages and vegetables to cutting board. Cut sausages into 1/2 inch pieces and peppers into thin strips.

Final Preparation:

2 cups grated mozzarella cheese
1/2 cup freshly grated Parmesan cheese
2 cups crumbled chilled soft fresh goat cheese (such as Montrachet; can also use Feta)
4 plum tomatoes, halved, seeded, chopped
3/4 cup chopped green onion tops

Place dough rounds on grill over medium heat until top of dough puffs and underside is crisp, about 3 minutes. Turn rounds over. Grill about 1 minute. Transfer to baking sheet with well-grilled side up. Sprinkle each with mozzarella and Parmesan. Top each with sausage, peppers, onion, goat cheese, tomatoes, and green onions. Drizzle each with 1 1/2 tablespoons vinaigrette. With large metal spatula, return pizzas to grill. Close grill and cook until cheese melts and dough is cooked through and browned, about 5 minutes. Enjoy.


I have to thank Chef Kyle Nicholson for teaching this to me. He was the Chef Instructor at Sur La Table 5 years ago when I first began taking cooking classes.


Happy Customers. Sorry for the glare. Can you guess which one is headed to death row?

Happy Eating.

Friday, January 27, 2012

Sage Pork Tenderloin

I am a lover of all things grilled: burgers, brats, and wings. This past 4th of July however, I found an ever greater love for food off the grill: Sage Pork Tenderloin. A fabulous home chef from Rachel's work was the master of this creation.


With burgers or dogs, you can buy them at the supermarket, open and immediately put on the grill. Not this culinary marvel; it takes preparation, massaging, and a whole lot of love. But it's definitely worth it. How can you ever go back to a simple hot dog or overcooked hamburger? Answer: you can't, but figure it out for yourself.

Sage Pork Tenderloin:

2 one-pound pork tenderloins

Rub:

2 Tablespoons leaf sage (dried)
1 1/2 Teaspoons kosher coarse salt
1 1/2 Teaspoons brown sugar
1 Teaspoon black pepper
1 Teaspoon garlic (minced)

Mix all Rub ingredients in a bowl; sprinkle over all areas of pork tenderloin; massage well, and I mean well; at least 30 minutes. This will tenderize the meat and allow the ingredients to penetrate, increasing flavor. 

Drizzle/Finishing Sauce:

1/2 Cup fresh packed sage leaves (cut finely)
6 Tablespoons butter
2 Tablespoons olive oil
3 Cloves garlic (thinly sliced)

Place tenderloins on a hot grill (500 degrees). Sear the outside to seal in the juices. Turn the meat throughout the cooking process. When outside is firm (approximately 25-30 minutes), check internal temperature with a meat thermometer; if 160 degrees, you are ready to eat. Put drizzle/finishing sauce ingredients in small pan. Place on grill until butter is melted (1-2 minutes). Cut pork on a bias, pour sauce over the top, enjoy!


I made this delicious dish at a college reunion; and made it again at a retreat in Bear Lake. For the Super Bowl next week, it's not so much the game I am looking forward to, but the sage pork tenderloin.

This will make you the most popular person at the BBQ, which is always my number one goal.

Happy Eating (and Grilling).


Friday, January 13, 2012

Roasted Tomato Bisque / Birthday Bisque

Ruby's 2nd Birthday was yesterday. We had a great party with family, friends and food. Rachel mentioned last week that she would be doing a star themed party for Ruby; star shaped grilled cheese sandwiches included. She said that it would be great to have tomato soup with the sandwiches. I got excited about making a tomato bisque that we made in class. I thank Chef Todd Leonard for the lesson.

It seemed to be a hit and I had some requests for the recipe. Even Rachel's Dad liked it; he doesn't even like tomato soups. After all these years I am finally winning him over.


Roasted Tomato Bisque:

1/8 pound whole butter
1 large yellow onion, large diced
1 rib celery, small diced
1 large carrot, peeled, cleaned and diced
1/8 cup garlic, minced
1/8 cup shallots, minced
1 tablespoon italian seasoning
1/2 cup red wine vinegar, to deglaze
3 beef steak tomatoes, char grilled and quartered
1/2 cans #10 diced tomato
1/2 cans #10 tomato puree
1/4 can #10 chili sauce
2 quarts vegetable stock
1 quart heavy cream
1/8 cup balsamic vinegar (add just enough to give it a kick)
1 tablespoon kosher salt, to taste
1/2 tablespoon fresh cracked black pepper, to taste

Cut and prepare mirepoix (onions, carrots and celery) and other ingredients as recipe follows.

Sweat the mirepoix with the butter, garlic, shallots, and italian seasoning until starting to brown.

Deglaze with the red wine vinegar and reduce.

Add the grilled tomatoes, canned tomatoes and reduce.

Add the puree, chili sauce and stir well.

Add the vegetable stock, stir well and bring to a simmer.

Reduce the soup until thick and hearty, make sure veggies are cooked soft.

Puree the soup with a hand mixer until smooth.

Temper the cream, add to pureed soup, continue to mix while adding balsamic, salt and pepper.

Taste and adjust seasoning as needed.

For an extra touch and to bring out the flavor, add some Worcestershire sauce, and a dab of tabasco. Let it simmer to allow flavors to further develop.

Serves: 15

It has a delicious, creamy bite to it. I love spicy food but kept it tame for the crowd.

Enjoy the deliciousness.

Happy Eating.

Saturday, September 10, 2011

Grilling Tips

Back in June I was asked to be the Grillmaster for a Ward BBQ. I brought my two nephews, Sous Chef Jesse and Sous Chef Sam. On the night before we spent many hours doing prep work as we prepared 3 varieties of burgers & a chicken dish. The night of the BBQ was intense; fed over 50 people. Lots of work, lots of fun. We even had 2 grease fires. The most aggravating part of the BBQ was when someone brought over a package of vegetarian burgers and asked me to cook them. How insulting!

Here is a list of grilling tips which I provided at the BBQ. Included here is the recipe for Cheeseburger of Champions; heavenly burger.

The summer may be winding down but there are many good days of grilling still.


Happy Eating
Related Posts Plugin for WordPress, Blogger...